This post will draft a bare-bones example on how to integrate your Azure Functions with Google's reCAPTCHA service. Anti-spam measures were briefly mentioned in an earlier post in this series on extending the Ghost platform using Azure Functions. Now it's time to implement that functionality.
If you haven't been following along with the series, don't worry about it. This article will restate any necessary contextual information. If you're interested, you can go back and read the series from the start.
Anti-Spam Techniques
Without implementing any anti-spam measures, it's likely that your form will be discovered and exploited by spambots. There are techniques other than CAPTCHA and reCAPTCHA services that can be leveraged to make your Azure Functions HTTP trigger less vulnerable to spamming.
My favorite non-reCAPTCHA approach is the honeypot method, which can be explained in detail a thousand times if you do a quick Google search. In brief, in your HTML form, you include fields that are not visible to a human user. A spambot will programmatically populate these fields and submit the form. On the backend, you can observe that these fields are populated, discard the request, and return a success message. The spambot will assume it has succeeded and will move on to the next victim.
The flaw with the honeypot technique is that your Azure Function endpoint is still exposed to a spamming from a more sophisticated spambot or a malicious actor. Any tech-savvy teenager can quickly create a script to repeatedly post data to your Azure Functions endpoint.
This is why I recommend going through the trouble (it's not much) of integrating with Google's reCAPTCHA service.
Google reCAPTCHA Keys
Before we dive into the code, you'll want to visit the reCAPTCHA website and set up a new website in the Admin Console. If you don't already have an account, you'll have to create one. It's free.
There are several options for client-side reCAPTCHA behavior. I chose to go with the invisible reCAPTCHA badge since it seemed to be the least intrusive option. When using the invisible reCAPTCHA, non-suspicious users are not presented with any challenge.
"By default only the most suspicious traffic will be prompted to solve a captcha."
This means most users won't even know that we have an anti-spam system in place.
After setting up your site in the Admin Console, you'll be provided two keys. The site key will be used on the client-side, our HTML form. The secret key will be used on the server-side, our Azure Functions HTTP trigger endpoint. It's important to not share the secret key with anyone.
Regardless of which reCAPTCHA type you've chosen to use, the integration on the backend will be the same. Feel free to choose the reCAPTCHA type that's best for you.
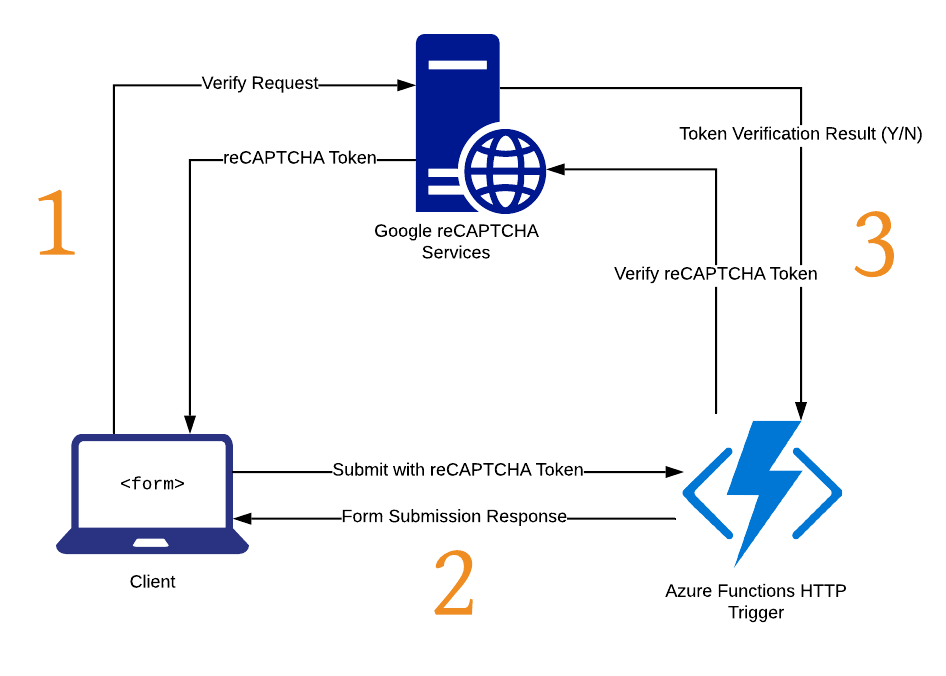
How it Works
Integration with the Google reCAPTCHA services can be broken down into three steps.
Step 1
The client requests a reCAPTCHA token from the Google reCAPTCHA services. A challenge may be presented at this time.
Step 2
The form is submitted to the Azure Functions HTTP trigger endpoint, including the reCAPTCHA token.
Step 3
The HTTP trigger function sends the reCAPTCHA token to the reCAPTCHA service to be verified. A success or failure message is returned.
Adding reCAPTCHA to Front-End
Please note that the purpose of this post is not to style and polish a perfect HTML contact form. The example form we'll be using is only meant to demonstrate raw functionality. Layout and styling concerns are completely up to you.
Take a look at what our HTML form looked like at the end of our last post that did not include a reCAPTCHA solution.
<h2>Contact Form</h2>

<form id="contact-form">
    <label for="name">Name<br>
    <input type="text" id="name" name="name" required></label>
    <br>

    <label for="email">Email</label><br>
    <input type="email" id="email" name="email" required>
    <br>

    <label for="message">Message</label><br>
    <textarea id="message" name="message" required></textarea>
    <br><br>

    <button type="submit">Submit</button>
</form>

<div id="success-message" style="display: none">
    <h3>Message Sent!</h3>
    <p>
        We're 87% sure that your message was sent. You should receive a reply within 8-12 business days.
    </p>
</div>

<script>
    var contactForm = document.getElementById("contact-form");
    var successMessage = document.getElementById("success-message");

    contactForm.onsubmit = (event) => {
        event.preventDefault(); // Don't let the browser submit the form.

        var payload = {};

        // Build JSON key-value pairs using the fields.
        contactForm.querySelectorAll("input, textarea").forEach(field => {
            payload[field.name] = field.value;
        });

        // Post the payload to the contact endpoint.
        fetch("http://localhost:7071/api/contact", {
            method: 'post',
            body: JSON.stringify(payload)
        }).then(resp => {
            if (!resp.ok) {
                console.error(resp);
                return;
            }

            successMessage.style.display = "block";
            contactForm.style.display = "none";
        });
    }
</script>
Now, with the help of Google's documentation, we're going to integrate our form with Google's invisible reCAPTCHA service. We don't have to make too many changes to get it to work. First, we have to include Google's reCAPTCHA JavaScript library somewhere in the <head> section of our HTML.
<script src="https://www.google.com/recaptcha/api.js" async defer></script>
Then we must update our form to verify that the user is not a spam-bot before posting to our Azure Function HTTP trigger. This is the approach I've taken:
<h2>Contact Form</h2>

<form id="contact-form">
    <div class="g-recaptcha"
            data-size="invisible"
            data-sitekey="My_Site_Key_Here"
            data-callback="submitContactForm">
    </div>

    <label for="name">Name<br>
    <input type="text" id="name" name="name" required></label>
    <br>

    <label for="email">Email</label><br>
    <input type="email" id="email" name="email" required>
    <br>

    <label for="message">Message</label><br>
    <textarea id="message" name="message" required></textarea>
    <br><br>

    <button type="submit">Submit</button>
</form>

<div id="success-message" style="display: none">
    <h3>Message Sent!</h3>
    <p>
        We're 87% sure that your message was sent.
        You should receive a reply within 8-12 business days.
    </p>
</div>

<script>
    var contactForm = document.getElementById("contact-form");
    var successMessage = document.getElementById("success-message");
    contactForm.onsubmit = checkRecaptcha;
    function checkRecaptcha(event) {
        event.preventDefault(); // Don't let the browser submit the form.
        grecaptcha.execute(); // Trigger the CAPTCHA verification.
        return false;
    }
    function submitContactForm() {
        return new Promise((resolve) => {
            var url = "http://localhost:7071/api/contact";
            var payload = {};
            // Build JSON key-value pairs using the fields.
            document
                .querySelectorAll("#contact-form input, #contact-form textarea")
                .forEach(element => { payload[element.name] = element.value });
            // Post the payload to the contact endpoint.
            fetch(url, {
                method: "POST",
                body: JSON.stringify(payload),
                headers: {
                    "Content-Type": "application/json"
                }
            }).then((resp) => {
                if (!resp.ok) {
                    console.error(resp); // Consider informing the user of the issue.
                   return;
                }
                successMessage.style.display = "block";
                contactForm.style.display = "none";
            });
            resolve();
        });
    }
</script>
There are two major changes to observe. Firstly, we've added a div to our form with special data- attributes.
<div class="g-recaptcha"
    data-size="invisible"
    data-sitekey="My_Site_Key_Here"
    data-callback="submitContactForm">
</div>
The reCAPTCHA library looks for this element within our form and uses the data- attributes as settings to control the behavior. Users do not see this element.
We've also added an additional step to our form processing JavaScript code.
contactForm.onsubmit = checkRecaptcha;

function checkRecaptcha(event) {
    event.preventDefault(); // Don't let the browser submit the form.
    grecaptcha.execute(); // Trigger the CAPTCHA verification.

    return false;
}
Now when we submit the form, grecaptcha.execute() is invoked. This sends a request to the Google reCAPTCHA service to verify if the user is a human or a spambot. Once verification is complete, the function we specified ass the callback data-callback="submitContactForm" will be invoked.
The result of the reCAPTCHA verification will be dynamically placed within our form in a new <textarea> element.
<textarea id="g-recaptcha-response" name="g-recaptcha-response" class="g-recaptcha-response" ... ></textarea>
So in our submitContactForm function, when we build our JSON payload using the form elements, the reCAPTCHA response will be included.
// Build JSON key-value pairs using the fields.
document
    .querySelectorAll("#contact-form input, #contact-form textarea")
    .forEach(element => { payload[element.name] = element.value });
Here's an example HTTP request body:
{
    "g-recaptcha-response": "giant_response_string...",
    "name": "Jane Doe",
    "email": "[email protected]",
    "message": "Hello, friend! How are you doing?"
}
Now we just have to use that g-recaptcha-response field on the server-side to ask the Google reCAPTCHA service if this user has actually been verified.
Note: if you're planning on using this script without running it through a transpiler, you should probably avoid using arrow functions since they're not supported in IE. Here's the same script without arrow functions, for your convenience.
// Same as above, but without using arrow functions.
var contactForm = document.getElementById("contact-form");
var successMessage = document.getElementById("success-message");

contactForm.onsubmit = checkRecaptcha;

function checkRecaptcha(event) {
    event.preventDefault(); // Don't let the browser submit the form.
    grecaptcha.execute(); // Trigger the CAPTCHA verification.

    return false;
}

function submitContactForm() {
    return new Promise(function(resolve) {
        var url = "http://localhost:7071/api/contact";
        var payload = {};

        // Build JSON key-value pairs using the fields.
        document
            .querySelectorAll("#contact-form input, #contact-form textarea")
            .forEach(function(element) { payload[element.name] = element.value });

        // Post the payload to the contact endpoint.
        fetch(url, {
            method: "POST",
            body: JSON.stringify(payload),
            headers: {
                "Content-Type": "application/json"
            }
        }).then(function() {
            if (!resp.ok) {
                console.error(resp); // Consider informing the user of the issue.
                return;
            }
            successMessage.style.display = "block";
            contactForm.style.display = "none";
        });

        resolve();
    });
}
Integrating Azure Functions with reCAPTCHA
There are dozens of packages available on NuGet that will help you integrate your .NET Core project with Google's reCAPTCHA verification service. We're not going to use any of them in this example.
All we need to do is make an HTTP request to Google's reCAPTCHA service that includes our secret key and the client's reCAPTCHA response. Google's service returns a thumbs up or a thumbs down. Given the simplicity of this interaction, I'd rather implement the integration on my own instead of depending on a third-party package.
Here's our new ContactForm model with the added RecaptchaResponse field.
public class ContactForm
{
    [JsonProperty("g-recaptcha-response")]
    public string RecaptchaResponse { get; set; }

    public string Name { get; set; }

    public string Email { get; set; }

    public string Message { get; set; }
}
Take note of the [JsonProperty("g-recaptcha-response")] attribute that's decorating the RecaptchaResponse property. We've added this so that the field that Google dynamically adds to our form (on the front-end, see above) is properly deserialized into our model. Alternatively, we could have added logic to the front-end JavaScript to rename this field while creating the payload. Do whichever you prefer.
Here is the code we're adding to our function to verify the reCAPTCHA response provided by the client.
var recaptchaUrl = $"https://www.google.com/recaptcha/api/siteverify?secret=My_Secret_Key&response={form.Value.RecaptchaResponse}";
var verificationResponse = await Http.GetAsync(recaptchaUrl);
var verificationContent = await verificationResponse.Content.ReadAsStringAsync();

if (!verificationResponse.IsSuccessStatusCode)
{
    throw new Exception($"Error while sending request to reCAPTCHA service. {verificationContent}");
}

// Not bothering to create a model for the verification response object.
dynamic verificationResult = JsonConvert.DeserializeObject(verificationContent);

if (verificationResult?.success == false)
{
    log.LogInformation($"reCAPTCHA verification failed.");
    return new BadRequestObjectResult(new[] { "reCAPTCHA verification failed." });
}
Below is the full contact function with the added reCAPTCHA integration. This is a continuation from the last post on validation in Azure Functions. If you're curious about input validation and you've yet to read through this article, now is your chance.
private static readonly HttpClient Http = new HttpClient();

[FunctionName("contact")]
public static async Task<IActionResult> Run(
    [HttpTrigger(AuthorizationLevel.Anonymous, "post", Route = null)] HttpRequest req,
    ILogger log)
{
    var form = await req.GetJsonBody<ContactForm, ContactFormValidator>();

    if (!form.IsValid)
    {
        log.LogInformation($"Invalid form data.");
        return form.ToBadRequest();
    }

    var recaptchaUrl = $"https://www.google.com/recaptcha/api/siteverify?secret=My_Secret_Key&response={form.Value.RecaptchaResponse}";
    var verificationResponse = await Http.GetAsync(recaptchaUrl);
    var verificationContent = await verificationResponse.Content.ReadAsStringAsync();

    if (!verificationResponse.IsSuccessStatusCode)
    {
        throw new Exception($"Error while sending request to reCAPTCHA service. {verificationContent}");
    }

    // Not bothering to create a model for the verification response object.
    dynamic verificationResult = JsonConvert.DeserializeObject(verificationContent);

    if (verificationResult?.success == false)
    {
        log.LogInformation($"reCAPTCHA verification failed.");
        return new BadRequestObjectResult(new[] { "reCAPTCHA verification failed." });
    }

    var sender = new MailgunSender(
        "sandboxcf5f41bbf2f84f15a386c60e253b5fe9.mailgun.org", // Mailgun Domain
        "key-8d32c046d7f14ada8d5ba8253e3e30de" // Mailgun API Key
    );

    Email.DefaultSender = sender;

    var email = Email
        .From("[email protected]")
        .To(form.Value.Email)
        .Subject("Contact Form Submission")
        .Body($"{form.Value.Name} submitted the following message: \n\n{form.Value.Message}");

    var response = await email.SendAsync();

    if (!response.Successful)
    {
        throw new Exception($"Failed to send mail. {string.Join(", ", response.ErrorMessages)}");
    }

    return new OkResult();
}
We use the HttpClient to send a GET request to Google's reCAPTCHA verification API. We deserialize the response body into an object with a dynamic type. This technique saves us from having to create a POCO model to represent the verification response object. I justify this laziness because we're only interested in one property on that object: success.
If you're interested, Google defines the shape of that verification response object in their reCAPTCHA docs. The full object looks like this:
{
  "success": true|false,
  "challenge_ts": timestamp,  // timestamp of the challenge load
  "hostname": string,         // the hostname of the site where the reCAPTCHA was solved
  "error-codes": [...]        // optional
}
So, we assess the success value of the verification response object and return a bad request (HTTP 400) when success is false. Otherwise, we continue with the rest of our function. Simple as that.
Final Thoughts
We've managed to protect our Azure Function contact form endpoint from those pesky spambots. As I'm sure you've noticed, our contact function is becoming rather long and unwieldy. All of the logic exists in one method and cannot be shared or unit tested. This is certainly not ideal.
The next article in this series will address these concerns by introducing dependency injection for Azure Functions. I'll walk through extracting logic into single-purpose classes that can be tested, reused, and injected into our Azure Functions HTTP triggers.
If you don't care about making your code testable and maintainable, then this post is the end of the line for you. Have fun with your contact form.
Feel free to leave a comment below if you have any suggestions, questions, or concerns.