In this article, I’m going to explain how to implement a custom contact form endpoint using Azure Functions with an HTTP trigger. If you’ve just landed here from Google, it’s likely you’ve missed my introductory post for this series. It highlights the why. In short, the Ghost blogging platform has a very limited feature set. A contact form is not included in that feature set. Therefore, I've opted to make my own using Azure Functions.
It should be mentioned that the strategy of leveraging Azure Functions to extend website functionality doesn't and shouldn't stop with Ghost. You can use Azure Functions or any other FaaS platforms to add functionality to anything you want.
This post will outline a quick and dirty contact function implementation, lacking all the technical bells and whistles. The focus will be getting to something that is functional in the shortest amount of time. I will be writing smaller supplementary posts to discuss concerns like anti-spambot measures, validation, inversion of control & dependency injection, continuous integration & continuous deployment, etc.
It is assumed that you already have an Azure account. If you do not yet have an Azure account, consider creating an account for free.
Azure Functions v1 vs Azure Functions v2
For this project, I’ve specifically chosen to use Azure Functions v2. An Azure Functions v2 project targets .NET Standard, while Azure Functions v1 targets the .NET 4.7 framework.
I don’t foresee myself ever creating a .NET application that targets the old .NET 4.7.* runtime. Any new dotnet project I start these days will surely target the latest .NET Core runtime. Therefore, if I want any of the code I write to be shared with my future development endeavors, it would be wise to choose Azure Functions v2.
Why not target the .NET Core runtime (netcoreapp2.1) instead of .NET Standard?
Great question. If that was currently a supported option for Azure Functions, I would have targeted netcoreapp2.1. Others in the community have already suggested that support for targeting .NET Core with Azure Functions be added and Microsoft is working on it. Until then, we’ll have to get by with targeting .NET Standard.
What does it mean to target .NET Standard?
Basically, it means two things: we are limited to NuGet packages (or any assembly dependencies) that target .NET Standard AND any shared libraries we create and reference must also target .NET Standard.
This isn’t usually a showstopper for me, since I’m often starting new projects. With new projects, developers should have an easier time avoiding incompatible libraries. It's much simpler to use something different or build it yourself.
For those that are planning to pull in a huge, existing .NET Core shared library that was created alongside a .NET Core web application (for example), refactoring that library to target .NET Standard may be a bit cumbersome.
Create Azure Functions Project
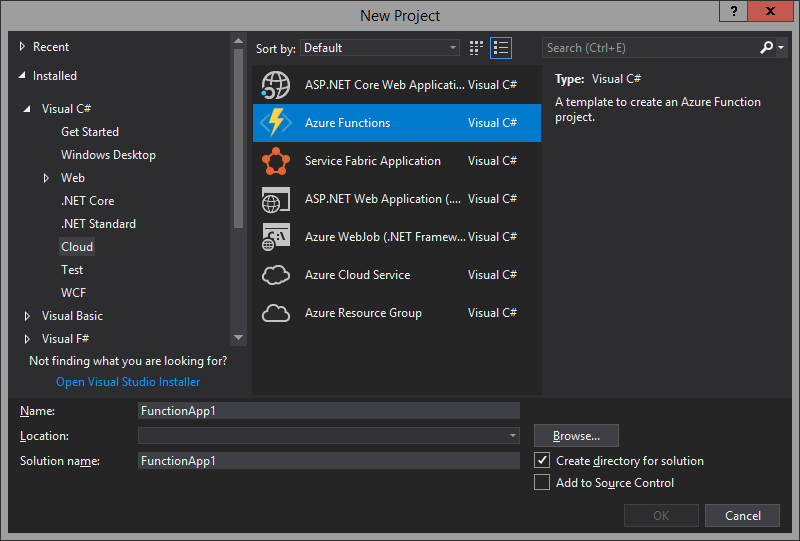
So, let's get started. Create a new project in Visual Studio and select the Azure Functions project template. You can find it listed under the Cloud templates.
Visual Studio is going to present a few more options before scaffolding your new Azure Functions project. These are the defaults:
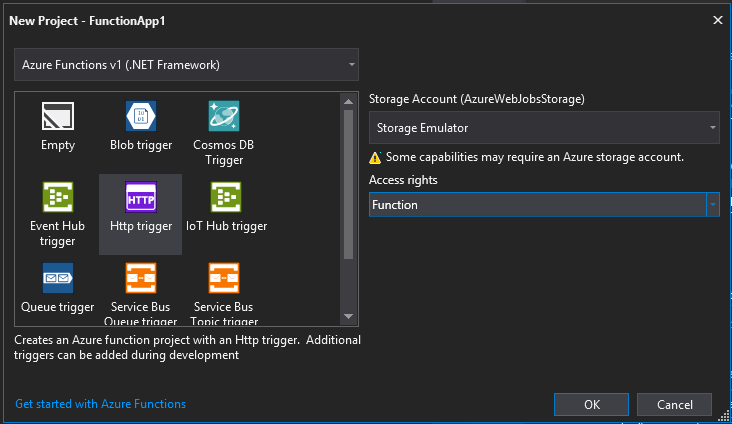
Note that the dropdown at the top is defaulted to "Azure Functions v1 (.NET Framework)". We want to change this to "Azure Functions v2" since we're interested in targeting .NET Standard.
There's also an "Access rights" dropdown on the right side that specifies how your function is secured. Since we're going to be hitting our HTTP endpoint from a public website, we want to switch this to "Anonymous". Don't worry if you've missed configuring the access rights, this can easily be changed later. You can read about the other security options on the Azure documentation site.

Once you press OK, you'll notice that your new project will be scaffolded with only four files.
Function1.cs
This is your Azure Function. It's a C# file with one public static method called Run. The Run() method is is invoked by the platform when the trigger is activated. In our case, the trigger will be an HTTP request. We'll touch more on this later.
host.json
You can think of the host.json file as a global config for your Azure Functions application. The configurations specified in this file apply to all of the functions in your project. There are all sorts of settings you can configure here.
You'll notice that the only setting currently in this file is version, which is specified to 2.0. This is referring to the version of Azure Functions that we're targeting. For a function with an HTTP trigger, other notable settings are routePrefix (defaults to "api"), maxOutstandingRequests, maxConcurrentRequests, and functionTimeout.
Overall, the defaults for the host.json file are reasonable, so we're not going to dive deep into modifying these settings. The host.json settings are mostly noise for our current goal of getting a working contact function published and running.
local.settings.json
For those of you familiar with .NET Core, this file is much like the appsettings.json file that you're used to working with. This is where you can configure app settings and connection strings that your functions may require at runtime. These settings are applied locally (hence local in the name) for development purposes and can optionally be encrypted.
Note that the local.settings.json file is not added to source control by default. The .gitignore file that was automatically generated when you created the project has a line to exclude the local.settings.json file (near the top).
This is an attempt to prevent developers from mistakenly adding secrets to source control, as the local.settings.json file will likely contain sensitive information (connection strings, private keys, passwords, etc.) that we would not want to exist forever in a code repository. This is especially true if you're working on a public repository.
Excluding this file from source control has been a bit controversial, as it will often contain non-secret appsettings in addition to secret appsettings. When another developer pulls down the repository, they will be forced to recreate this file before they can run or debug the application locally. This is burdensome.
That's enough on local.settings.json, for now. My preferred solution to local application setting management for Azure Functions is described in another article. At this point in our contact form project, it's good enough to just be aware of the default behavior.
About the Sample Function
First, take a quick look at the sample function class that was scaffolded when we created the project.
[FunctionName("Function1")]
public static async Task<IActionResult> Run(
    [HttpTrigger(AuthorizationLevel.Function, "get", "post", Route = null)] HttpRequest req,
    ILogger log)
{
    log.LogInformation("C# HTTP trigger function processed a request.");

    string name = req.Query["name"];

    string requestBody = await new StreamReader(req.Body).ReadToEndAsync();
    dynamic data = JsonConvert.DeserializeObject(requestBody);
    name = name ?? data?.name;

    return name != null
        ? (ActionResult)new OkObjectResult($"Hello, {name}")
        : new BadRequestObjectResult("Please pass a name on the query string or in the request body");
}
You'll find one method: Run(). It accepts two arguments.
The first argument is an HttpRequest containing everything we might want to know about the request context, including any request parameters or payload. This HttpRequest argument is decorated by an HttpTrigger attribute. As you have already concluded, I'm sure, this attribute is used to configure the HTTP trigger and route binding.
The [HttpTriger] attribute accepts an AuthorizationLevel enum, a param string list of accepted HTTP methods (get, post, etc.), and an optional route string. We can change that AuthorizationLevel enum to configure the security for the function. We're going to keep this set to AuthorizationLevel.Anonymous since our HTTP endpoint will be publicly exposed. This means anyone with the URL for our endpoint will be able to execute our function.
The second argument accepted by Run() is a logging service (ILogger). This is a great trace/debugging resource. When running your function locally, the logs will appear in the console. In Azure Portal, you can view the output of these logs by navigating to the Application Insight application tied to your Functions application.
Before we start changing the code, go ahead and run the application. You'll notice a pile of console logs all regarding a host.
- Initializing Host…
- Starting Host…
- 1 functions loaded…
- Host Started…
- Etc.
This is important to understand. Our Azure Functions project is not an executable application. It doesn't even target a .NET runtime. There is no Main(string[] args) method anywhere. There is no process dedicated to our application. We're basically making a class library.
The function must be executed by a host. The host is an application that does target a .NET runtime. The host receives the HTTP request and routes it to our function, injecting both the request context and the logger.
For Azure Functions v2, the host is targeting netcoreapp2.1. For Azure Functions v1, the target is .NET 4.7.*.
After the host init logs have completed, you will see a list of all available functions and their HTTP routes. Try navigating to our function's URL in a browser and observe the results. Then try again by adding the name querystring parameter.
http://localhost:7071/api/Function1?name=Tom
Also, note how the URL is composed: http://<server>/api/<function-name>. This is driven by the [FunctionName] attribute decorating the Run() method, the Route property of the [HttpTrigger] attribute, and the routePrefix setting in the host.json file.
Implement the Contact Function
Here's one of the simplest implementations you could come up with. It works, but it's definitely not ideal. We'll get into that later.
[FunctionName("contact")]
public static async Task<IActionResult> Run(
    [HttpTrigger(AuthorizationLevel.Anonymous, "get", Route = null)] HttpRequest req,
    ILogger log)
{
    var form = req.GetQueryParameterDictionary();

    log.LogInformation($"Payload -- {form["name"]} {form["email"]} {form["message"]}");

    var sender = new MailgunSender(
        "sandboxcf5f41bbf2f84f15a386c60e253b5fe9.mailgun.org", // Mailgun Domain
        "key-8d32c046d7f14ada8d5ba8253e3e30de" // Mailgun API Key
    );

    Email.DefaultSender = sender;

    var email = Email
        .From("[email protected]")
        .To(form["email"])
        .Subject("Contact Form Submission")
        .Body($"{form["name"]} submitted the following message: \n\n{form["message"]}");

    var response = await email.SendAsync();

    if (!response.Successful)
    {
        throw new Exception($"Failed to send mail. {string.Join(", ", response.ErrorMessages)}");
    }

    return new OkResult();
}
We’re binding to both the GET and POST HTTP verbs. Eventually, we'll revise this to just be POST. For now, it will be simple to test the function in a browser using HTTP GET by navigating to the function URL.
http://localhost:7071/api/contact?name=tom&[email protected]&message=Hello!
Notice that I'm using a library called FluentEmail. FluentMail provides a simple, easy to use, easy to read fluent interface for sending emails from your application. There are additional packages available for different Senders (sender service classes implementing the ISender interface). I've chosen to use the MailGun service to send emails, so I've also included the FluentEmail.MailGun library. You can add these packages to your project via NuGet. They are compatible with .NET Standard.
If you don't want to use MailGun, you can choose a different sender, like SendGrid or even just plain old SMTP. That's completely up to you. With MailGun, the first 10,000 emails are sent for free every month.
You obviously don't have to use the FluentMail library, either. There are many other options available on NuGet. Whatever you choose, your implementation will look similar enough to follow along with this series without issue.
Create the Form
Here's a really simple HTML form you can use to test your function. You can open it up as an HTML file in your browser locally or on a new "page" in your Ghost application.
<!DOCTYPE html>
<html>
<body>
  <h2>Contact Form</h2>

  <form action="http://localhost:7071/api/contact">
    Name<br>
    <input type="text" name="name">
    <br>
    Email<br>
    <input type="email" name="email">
    <br>
    Message<br>
    <textarea name="message"></textarea>
    <br><br>
    <button type="submit">Submit</button>
  </form>
</body>
</html>
At this point, you should be able to run your function and test it out with your form. Be sure to update the action on the form element to point at your function's URL.
Once you successfully submit the form, you will be taken to a blank page. This is because our function responds with just an HTTP OK response code, no content. We could change our function to respond with a nice HTML page to confirm that the message was sent, but I don't want to tightly couple our contact function to our website. I want the website to be responsible for all presentation concerns and I want the function to be responsible for sending emails. Let's not mix the two.
In order to achieve the desired separation, we're going to change the function to accept a JSON payload instead of a pile of querystring parameters. We'll also add some JavaScript to our form to control posting the form data and displaying a success message.
[FunctionName("contact")]
public static async Task<IActionResult> Run(
    [HttpTrigger(AuthorizationLevel.Anonymous, "post", Route = null)] HttpRequest req,
    ILogger log)
{
    var json = await req.ReadAsStringAsync();
    var form = JsonConvert.DeserializeObject<ContactForm>(json);

    log.LogInformation($"Payload: {form.Name} - {form.Email} - {form.Message}");

    var sender = new MailgunSender(
        "sandboxcf5f41bbf2f84f15a386c60e253b5fe9.mailgun.org", // Mailgun Domain
        "key-8d32c046d7f14ada8d5ba8253e3e30de" // Mailgun API Key
    );

    Email.DefaultSender = sender;

    var email = Email
        .From("[email protected]")
        .To(form.Email)
        .Subject("Contact Form Submission")
        .Body($"{form.Name} submitted the following message: \n\n{form.Message}");

    var response = await email.SendAsync();

    if (!response.Successful)
    {
        throw new Exception($"Failed to send mail. {string.Join(", ", response.ErrorMessages)}");
    }

    return new OkResult();
}
We also have a model used to deserialize our payload properties. I called it ContactForm.
public class ContactForm
{
    public string Name { get; set; }

    public string Email { get; set; }

    public string Message { get; set; }
}
Here's the updated form implementation. As mentioned, this implementation includes some JavaScript to post the contact form data with AJAX and update the screen with a success message.
<h2>Contact Form</h2>

<form id="contact-form">
    Name<br>
    <input type="text" name="name" required>
    <br>
    Email<br>
    <input type="email" name="email" required>
    <br>
    Message<br>
    <textarea name="message" required></textarea>
    <br><br>
    <button type="submit">Submit</button>
</form>

<div id="success-message" style="display: none">
    <h3>Message Sent!</h3>
    <p>
        We're 87% sure that your message was sent. You should receive a reply within 8-12 business days.
    </p>
</div>

<script>
    var contactForm = document.getElementById("contact-form");
    var successMessage = document.getElementById("success-message");

    contactForm.onsubmit = function(event) {
        event.preventDefault(); // Don't let the browser submit the form.
        var payload = {};

        // Build JSON key-value pairs using the form fields.
        contactForm.querySelectorAll("input, textarea").forEach(field => {
            payload[field.name] = field.value;
        });

        // Post the payload to the contact endpoint.
        fetch("http://localhost:7071/api/contact", {
            method: 'post',
            body: JSON.stringify(payload)
        }).then(resp => {
            if (!resp.ok) {
                console.error(resp);
                return;
            }
            // Display success message.
            successMessage.style.display = "block";
            contactForm.style.display = "none";
        });
    }
</script>
Should we pull this custom JavaScript into a separate file so it can be properly bundled and cached? Probably. For now, this is fine.
Note that we've also included some HTML5 validation attributes (required) since we basically get those for free. I’m sure you’ve seen these in action before.
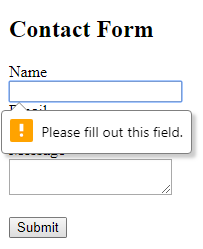
If you want to customize the front-end validation experience further, you can bloat this solution up with more JavaScript. For now, the browser’s default validation behavior is good enough for my purposes.
Also note that I’ve included no styling in the example form markup, so it’s going to appear quite plain. I encourage you to make it your own with some CSS.
CORS Settings
Since we've changed the HTML form implementation to use the JavaScript Fetch API to send the JSON payload, we need to change our function configuration to allow CORS. Add CORS: * to your local.settings.json. This will allow for all (*) origins to invoke your endpoint. If you don't allow CORS, you will witness some CORS errors when trying to post data to your endpoint. The updated local settings file will look something like this.
{
  "IsEncrypted": false,
  "Values": {
    "AzureWebJobsStorage": "UseDevelopmentStorage=true",
    "FUNCTIONS_WORKER_RUNTIME": "dotnet"
  },
  "Host": {
    "CORS": "*"
  }
}
After changing your local settings to allow CORS for all origins, you will be able to hit your local contact function URL with your new HTML form. In order for your contact function to allow CORS in the Azure environment, you'll have to configure the CORS settings on your Azure Functions app. You can easily do this via the portal.
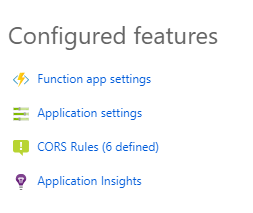
Open your Azure Functions App in the portal and select the CORS Rules option. From there you can add to the list of allowed origins. Make sure you add all supported variations of your website address here (https://www.my-awsome-blog.com, https://my-awsome-blog.com, http://my-awsome-blog.com, etc).
Deployment
Microsoft has made it incredibly easy to deploy your Azure Functions straight from Visual Studio. This isn't the greatest long-term strategy, but it will work for our current needs.
Simply right-click on your Azure Functions project in Visual Studio and select Publish from the context menu. If you don't have an Azure account already, now is the time where that will be necessary. The publish wizard will connect to your Azure account and allow you to create an Azure Functions Application if you haven't done so already.
Going Further
This simple function will work, but we've left a lot of room for improvement. Here are some of the enhancements I'll be demonstrating in other posts:
- Environment Settings – Information like the from email address and Mailgun keys should be coming from environment settings instead of being hardcoded. You can read a bit more on that here.
- Validation – Our function accepts input from the client. It's a best practice to validate that input. Which fields are required? What's the max length? Etc. We want to implement validation in a maintainable manner, avoiding a mess of if/else blocks. Click here for a detailed explanation on how to validate your HTTP trigger functions.
- Anti-spam Measures – Since the function will be publicly exposed, there's no telling who will invoke it. Perhaps a web spider will find your form and attempt to submit it. Maybe a malicious coworker will write a node script to continuously post random data to your endpoint. We need to leverage a technology like Google's reCAPTCHA service to reliably guard against spam. Click here to read about how to integrate your Azure Function with Google's reCAPTCHA service.
- Testability – We should strive to write testable code and then test it. Given that the function instantiates dependencies, it is currently untestable. We need to configure an inversion of control container and update our function to support dependency injection.
- Continuous Integration & Continuous Deployment – Even though deployment from Visual Studio is effortless, wouldn't it be great if we could set up an automated build and deployment pipeline? We can do this with little effort and no money.
If you have thoughts for other enhancements or questions on what has been covered so far, feel free to comment below.